

dji osmo mobile
First Use
 Just completed filming on an action fight sequence, and for the first time made use of the DJI Osmo Mobile, which is a 3 axis gimbal stableliser.
Filming hand-held and getting a smooth shot is never easy and it seems to me that the process and kit is getting both more complex and heavier. I’ve filmed using the MoVi fitted with a Canon C300 MKI. While it’s a very impressive bit of kit particularly with the remote controller, it was heavy in use, too heavy for extended use and I would suspect that in long term use it is going to put pressure on your back. So while I love this piece of kit I’ve been looking around for something lighter and to be honest much cheaper to buy.
Enter the DJI Osmo Mobile, it ticks all the boxes, it’s lightweight and uses the camera you already have in your pocket, your smart phone. Mine is the iPhone 6 and in preparation for the shoot I purchased the Filmic Pro App.
Filmic Pro App
 The Filmic Pro App, which allows you full manual control of the camera settings on the iPhone and most importantly supports the DJI Osmo Mobile. Personally I found this App relatively intuitive to use, but I checked out the online manual to find out the how to use some of the more advanced features like rack focusing.
I had a few issues with the App during filming but I’ll go into that in another post but lets just say I nearly ditched using it during the project and just going with the DJI Go App which comes with the Osmo.
The DJI Osmo Mobile performance
The plan was to use the DJi Osmo mobile for the close up shots and for scenes where we planned to follow the action. First impressions were good, the movement was stable and smooth and the footage would not need any stabilisation in post production. This was promising and the quality of the footage from the iPhone was great, Filmic Pro lets you set the resolution up to 3K and to 50 Mbps, so my settings were HD 1080p and 50 Mbps.
 The link to the DJI Osmo mobile was a bit iffy and I needed to reset a few times but in use the setup is light, highly manoeuvrable and perfect for getting close to the action and places with limited access. Walking across an uneven surface didn’t faze this device and saved hours that would have been spent setting up track and dolly to get the same shots.
I’d not want to film a feature using this setup but for a short film this setup is perfect and I suspect with additional add ons like lenses with different focal lengths using the 35mm adapter/Image Flip and Anamorphic lenses like the Moondog Anamorphic 2.40:1 adapter you could have the perfect setup for a micro budget film.
Whats coming next? watch out for my posts on using Filmic Pro and Filming the short film ‘Fight or Flight’


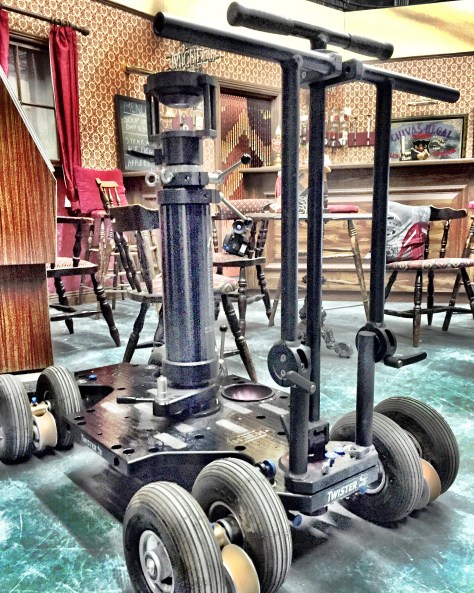 In my previous post I talked about the camera the Arri Alexa, in this post and in part 2 I’m going to be looking at the Panther Dolly, the Vario Jib and Track.
 For this workshop we first fitted the side platforms, which sit between the wheels, extending the sides to allow for operators to stand/sit on the dolly.
 For this workshop the Bazooka the Rotary Adapter and the Bowl was already fitted. The Bazooka (That’s the central post that the camera is mounted onto) is height adjustable by turning the lever at the top anti clockwise being very careful not standing immediately over it as it is gas powered and rises under considerable pressure when the lever is released particularly if unloaded, that is without the tripod head and camera installed. There’s a bowl integrated into one side of the dolly platform for mounting a camera via a tripos head directly to the platform for low level shots.


 As I mentioned before the Arri does not have a built in ND Filter that’s why when you see Arri Alexa’s they always seem to have a Matte Box setup to carry the filters as well as shield the lens from unwanted light. For this shoot we didn’t have an ND Filter to hand so we maxed out, closing down the aperture to F22, when ideally a 6x ND would have been perfect for this shoot to get that shallow depth of field. It is possible to modify/accessorise the Lens mount to provide ND filtering, check with Arri for more information on this.
 The other solution is to usual an actual light meter and take a reading in front of the actors faces. So make a note book out a light meter and make sure you know how to use it correctly. The EVF (Electronic Viewfinder) has a false colour button which others some exposure guidance and I’m guessing with practice this maybe all you need to correctly judge exposure.

 So it’s a simple camera to use, everything is manual, there’s no feedback from the lens (no aperture reading indicators no histogram/vector scopes, there is peaking but no Zebras) to the camera so what you see in the EVF is what you get. The lens mount is PL (Positive Lock) and I’m using Arri Cinema prime lenses in the main and a 15.5 to 45mm FUJINON Alura Zoom. Now when I say this camera is simple you would struggle to do everything yourself so I’d say the camera crew would need to be at least 2 person for operation maybe 3 to cover everything excluding sound.
 Did I say it is a heavy camera? it really is so don’t expect to get away with a standard heavy duty video tripod, you need something more substantial than that to support this camera.
 Setting the camera up for basic recording is simplicity itself just a menu button, buttons above each section and a rotary selection knob with push operation for selecting options. My typical default settings would be Prores 4444 (yeah I know that extra 4 😉 ) and HD at 25FPS. Then just set the Shutter angle to 180 and White Balance to auto to start and then adjust the actual white balance between shots using a grey card. Native ISO is 800 so leave that as is unless you need to work in anything but optimum lighting conditions (Note there is no ND filters built into the camera). Keeping it simple use the Log C setting but if you have your own personal LUT you can import those. There’s an SD card slot for adding and storing personal settings.