

Yayu and the Wimborne Folk Festival a Cinéma Vérité style short documentary and web/television series.

Yayu & The Wimborne Folk Festival is now a FINALIST for Best Documentary short for the 2018 Aphrodite Film Awards in New York.
Yayu & The Wimborne Folk Festival has been officially selected for the 2018 Aphrodite Film Awards in New York.

Yayu & The Wimborne Folk Festival has been officially selected for the London International Motion Picture Awards 2019
The Official Trailer Yayu & The Wimborne Folk Festival

For this Television shoot we filmed the 2018 Wimborne Folk Festival over two days, using my trusted Canon C300 MK1 and now relatively ancient Canon 60D, operated by my goto camera person Listya, who knows this camera and my preferred style of filming from us working on so many film projects together. I like the observational style of documentary filming but of course my filming subjects are interacting with the camera in the Cinéma Vérité style, which I think works well and is significantly better in my experience than the default documentary style, where you film a bit of footage, fly on the wall and insert interviews in a boring fashion in between the action or add on narrative because the images don’t really interpret what is going on. Although I have of course added some narration myself but only the minimal amount required for a very short sequence in the film.

As well as using my own cameras I also got to use my newly acquired Aputure LED lighting for the interior scenes shot in the restaurants kitchen. These new lights are a vast improvement over the Red Heads I used to have. They are battery powered and CRI 95+ (Colour Rating Index) rated, which means they are effectively daylight rated, They were perfect for indoor use in the limited space of a kitchen and independent of power sockets. This meant they could be positioned in just the right location without the compromise of being near a power socket or with the limitations of having to use extension cables and their associated risk assessments, trip hazard etc.
As usual I made sure I had plenty of coverage, I’ve probably got enough footage to create several film edits, but as this is hopefully destined for commercial Television or web series the required length is typically around 20 minutes including credits, to allow for advertising during its 30 minute slot. I might create a standalone edit of the festival for promotional purposes by Wimborne B.I.D if requested.
The full Folk Dance sequence ( Fertility Dance )
Yau & The Wimborne Folk Festival is in post production, which I am editing on my recently updated MacBook Pro running the latest version of Premiere Pro CC and After Effects CC. There’s several updates to the latest versions of Adobe CC, which includes some very interesting title creation tools, which I may include in creating the final version of this edit. Watch out for my blog entry on this.

I am also currently working on my least favourite part of the filmmaking and editing process, creating English captions for the International markets. I tried one of the few automated processes first, with some hilarious results, but for accuracy you really have to just sit down and transcribe the film, create a list and manually copy and paste into the captions box and the timeline.
With the filming completed and editing well under way, there’s already plans to create the followup episode and indeed episodes to be filmed both here in the UK and in Indonesia at the end of the year with support from the Indonesian Ministry of Culture and Tourism.
 A short extract from the Indonesian Television Pilot ‘Yayu & the Wimborne Folk Festival’ , which will soon be released this year. This scene was created to explore Indonesian culture here in England. As Yayu is in the process of creating a greater presence in the UK promoting Indonesia culture through her food and books.
Yayu Garden Party – a short extract from the film ‘Yayu and The Wimborne Folk Festival’


 The client requested the addition of inspirational titles, which initially were just going to be static titles cross dissolving from one to the next, but instead I decided to create a short sequence in Adobe After Effects as I knew from experience it was something I could easily put together. Also it would look much more impressive as an intro rather than the alternative of a static title. Of course it is much more labour intensive and would take a few hours to design and create but I and most importantly the client thought the effort was worth it.
 The production of the promotional video itself took place over several evenings and a Saturday morning, as we wanted to film the actual classes and interview tutors while they were actively engaged with their students. The film has a documentary feel to it, a mixture of interviews and observation (B-roll), which seems to work well. For the final version I worked with the client to decide what was important to include in the film and what additional pick up shots would be needed to promote the key features of the course and benefits of studying at the AUB, after editing the final film was just short of nine minutes long.
  This version is intended to be shown at events and in lectures to prospective students in lecture theatres. A short sub 60 second version was edited for upload to the internet for use on the short courses website and in online promotion.
 The actual production took place over a few weeks on an evening and on the odd day basis, In all I estimate 3 days in filming. The cameras used varied depending on what was available and with the introduction of new kit.
 My old but great Canon 60D was used at the outset for most of the filming in conjunction with a Canon 650D for both the interviewing and B-roll. The opening sequence was filmed on my iPhone 6 using the DJI Osmo, while only a short sequence of this footage was used in the final version of the promotional video, there are several minutes shot in several locations that did not make it to the final cut.
 Finally I shot some of the interview and campus footage using my Canon C300 with the trusty 24mm to 105mm F4 L and a newly acquired Tokina 12mm to 28mm F2.8
 Sound came from a mixture of shotgun microphone recording directly to camera (Stereo) and shotgun recording to a Zoom H4N (Mono). The interviews were recorded to the external recorder with the microphone attached to a microphone stand positioned as close to the subject as possible in fact just out of shot. The stereo microphone was used to record general ambience as I wanted the sounds of the students rather than just a music track.
 Just completed filming on an action fight sequence, and for the first time made use of the DJI Osmo Mobile, which is a 3 axis gimbal stableliser.
 The Filmic Pro App, which allows you full manual control of the camera settings on the iPhone and most importantly supports the DJI Osmo Mobile. Personally I found this App relatively intuitive to use, but I checked out the online manual to find out the how to use some of the more advanced features like rack focusing.
 The link to the DJI Osmo mobile was a bit iffy and I needed to reset a few times but in use the setup is light, highly manoeuvrable and perfect for getting close to the action and places with limited access. Walking across an uneven surface didn’t faze this device and saved hours that would have been spent setting up track and dolly to get the same shots.


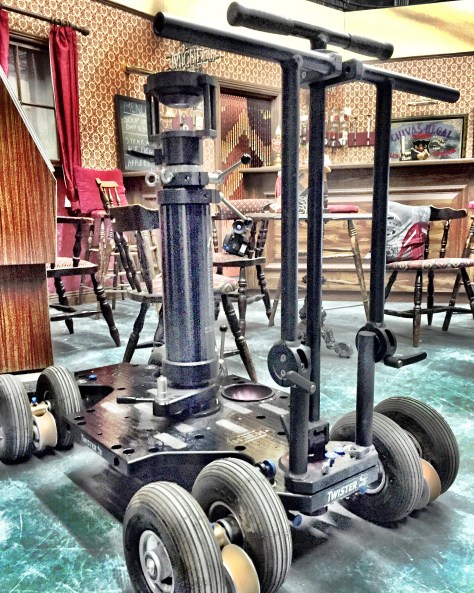 In my previous post I talked about the camera the Arri Alexa, in this post and in part 2 I’m going to be looking at the Panther Dolly, the Vario Jib and Track.
 For this workshop we first fitted the side platforms, which sit between the wheels, extending the sides to allow for operators to stand/sit on the dolly.
 For this workshop the Bazooka the Rotary Adapter and the Bowl was already fitted. The Bazooka (That’s the central post that the camera is mounted onto) is height adjustable by turning the lever at the top anti clockwise being very careful not standing immediately over it as it is gas powered and rises under considerable pressure when the lever is released particularly if unloaded, that is without the tripod head and camera installed. There’s a bowl integrated into one side of the dolly platform for mounting a camera via a tripos head directly to the platform for low level shots.


 As I mentioned before the Arri does not have a built in ND Filter that’s why when you see Arri Alexa’s they always seem to have a Matte Box setup to carry the filters as well as shield the lens from unwanted light. For this shoot we didn’t have an ND Filter to hand so we maxed out, closing down the aperture to F22, when ideally a 6x ND would have been perfect for this shoot to get that shallow depth of field. It is possible to modify/accessorise the Lens mount to provide ND filtering, check with Arri for more information on this.
 The other solution is to usual an actual light meter and take a reading in front of the actors faces. So make a note book out a light meter and make sure you know how to use it correctly. The EVF (Electronic Viewfinder) has a false colour button which others some exposure guidance and I’m guessing with practice this maybe all you need to correctly judge exposure.

 So it’s a simple camera to use, everything is manual, there’s no feedback from the lens (no aperture reading indicators no histogram/vector scopes, there is peaking but no Zebras) to the camera so what you see in the EVF is what you get. The lens mount is PL (Positive Lock) and I’m using Arri Cinema prime lenses in the main and a 15.5 to 45mm FUJINON Alura Zoom. Now when I say this camera is simple you would struggle to do everything yourself so I’d say the camera crew would need to be at least 2 person for operation maybe 3 to cover everything excluding sound.
 Did I say it is a heavy camera? it really is so don’t expect to get away with a standard heavy duty video tripod, you need something more substantial than that to support this camera.
 Setting the camera up for basic recording is simplicity itself just a menu button, buttons above each section and a rotary selection knob with push operation for selecting options. My typical default settings would be Prores 4444 (yeah I know that extra 4 😉 ) and HD at 25FPS. Then just set the Shutter angle to 180 and White Balance to auto to start and then adjust the actual white balance between shots using a grey card. Native ISO is 800 so leave that as is unless you need to work in anything but optimum lighting conditions (Note there is no ND filters built into the camera). Keeping it simple use the Log C setting but if you have your own personal LUT you can import those. There’s an SD card slot for adding and storing personal settings.